I think my head model turned out pretty well in the end. I tried to ensure I didnt pronounce the features too much and make the model look to sharp, which I think shows in the end result. The cheeks look slightly over pronounced now though, so I would go back and change these if I had the oppotunity again.
I enjoyed creating the model, as I have always loved computer games, and have always wondered how people are created in games, and this has gives me a really good insight. I'm fairly confident I could create an entire person now if I wanted to.
As for the materials, I do like the end material applied to the model, although I prefer the material I used when I just applied it to the face near the beginning of modelling.
Overall though I am happy with the end result, but if I got the opportunity to try it again, I would definately change up a few things!
Friday, 22 October 2010
Animating.
I decided to animate my model slightly, just for fun, to see what I could do with it. I only produced 2 quick Animations, which I have saved in a seprate file in MAX.
Firstly, I attempted to make my model smile. For this I just extended the edges of the mouth up and out slightly. It came out a little crude, but as I said, it was only a quick animation.
I also animated a wink. For this, I did a few modifications to the model. I started by closing the right eyelids, to create the wink. I also kinked one side of the mouth. And finally twisted the head slightly. This gives the impression of a wink in real like, if you get what I'm saying!
Firstly, I attempted to make my model smile. For this I just extended the edges of the mouth up and out slightly. It came out a little crude, but as I said, it was only a quick animation.

I also animated a wink. For this, I did a few modifications to the model. I started by closing the right eyelids, to create the wink. I also kinked one side of the mouth. And finally twisted the head slightly. This gives the impression of a wink in real like, if you get what I'm saying!


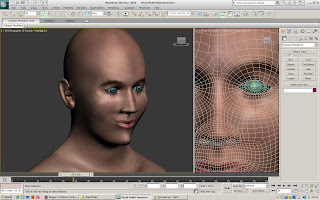
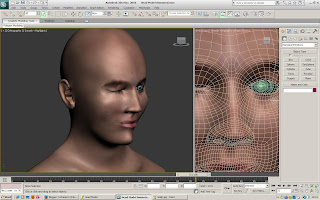
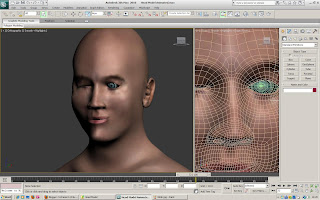
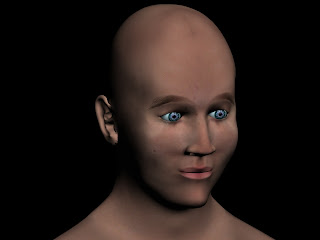
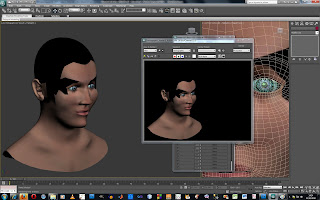
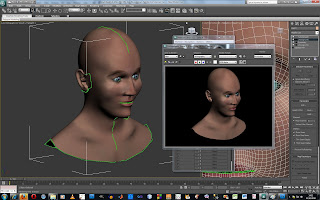
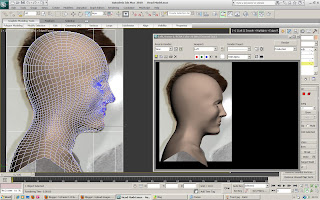
Finished Render.
Here is a render of the model after a couple of adjustments.
A Specular level and gloss have been added to the map, along with the map being adjusted slights, so that the lips fit better, and the eyebrows sit lower on the face. You can also make out the mole on my cheek better along with some skin pores.
A Specular level and gloss have been added to the map, along with the map being adjusted slights, so that the lips fit better, and the eyebrows sit lower on the face. You can also make out the mole on my cheek better along with some skin pores.

Thursday, 21 October 2010
Specular Level.
I decided to add a slight Specular level to my material to give it a natural glow. i also gave it a slight gloss, as natural skin does reflect light ever so slightly.
Here is a screenshot of me adjusting the levels to get them just right.

Here is a screenshot of me adjusting the levels to get them just right.

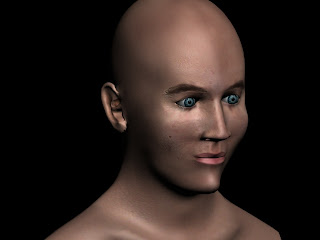
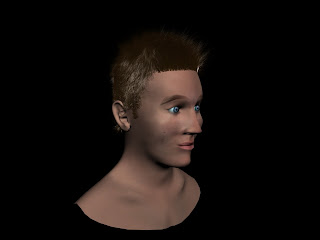
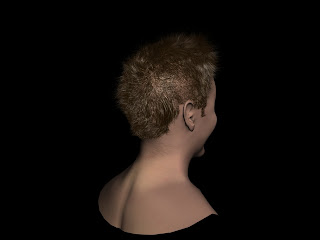
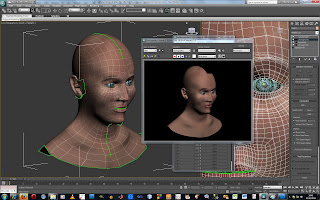
Complete Model.
Here is a few images of the complete model, with and without hair.
I tried to get the hair to work as well as I could with the model, however, I found it extremely tricky to be able to style the hair correctly. The tools didnt seem to want to do what I wanted them to do at all. I ended up trying to style the front, and the tools ended up styling the front and the back at the same time, which was annoying as I had to go back and adjust the back, then the front, then the back again etc.
As you can see, the haior colour is also off. This was another aspect I found tricky to get right. You are supposed to be able to model tip and root colours, however, neither seemed to have a great effect on the result, and this was the best colour I could come up with, without my hair looking black or grey.
As for the model itself... well I'm relatively pleased with it, but it could be alot better. I think it bares some resemblance to me, but I don't think people would know it was me if they weren't reading my blog!
Im happy with the Face Map, however. Spending time in photoshop, and using skin from various photos paid off, and it gave me a realistic looking texture. I included my hairy neck, which if you know me you'll have noticed! This ties in really well with the hair modifier on the back. I actually quite like the model with hair from a rear view!
I think I may tinker with the map a little bit though, to get it looking more like me. At the moment, I think my eyebros are sitting too high for a start! I don't like the eyes either, but I'm not sure how I can get them to look more like my own eyes. Currently, my model looks quite shocked due to the eyebrows and eyes.!
Here are some renders of the model. Hair only renders in a perspective view, which is another thing I don't like about 3dSMAX. It makes my model looked distorted and stretched. My nose looks pointy, which it isnt in the regular views.
Anyway, here they are!...


Wednesday, 20 October 2010
Hair.
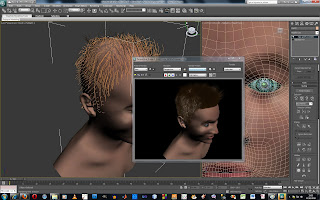
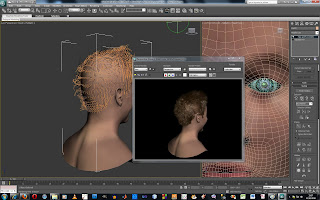
I tried using the hair and fur modifier to give the model some realistic looking hair.
I originally thought that it was impossible to style hair in 3DSMAX, but I soon discovered it was possible. However, the tools are a little crude, and don't really give the result you want. It seems that if you style one side of the head, it affects the other side, and this goes for brushing, cutting and scaling the hair, which was rather annoying. I kept thinking one side was done, and was looking good, only to discover the other side now looked like someone had gone wild with a set of clippers and mauled my hair.
Hair only renders in perspective views, which was another pain, as it distorted my model.
Here's some screenshots of me modelling the hair.


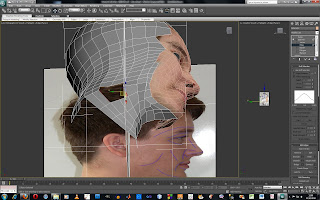
Tuesday, 19 October 2010
Face Mapping.
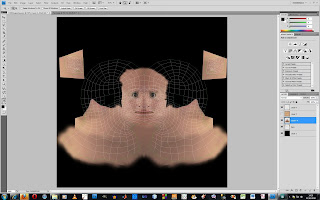
So that I could make an accurate material for my model, I exported the UVW Unwrap as a png. file.
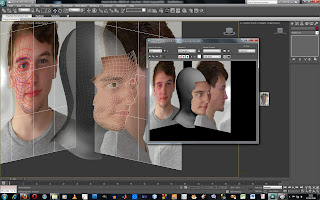
I then opened this in Photoshop, so that I could start piecing together my face.
i applied a dark background layer so that i could see the mesh, and put the mesh as the top layer, so that I could work in between these 2 layers with all my different face parts.
Here is a screenshot of the first few steps.
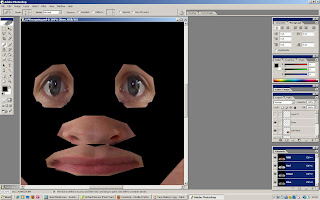
As you can see, I have taken my neck texture from my original photos of my head, and started making the mouth.

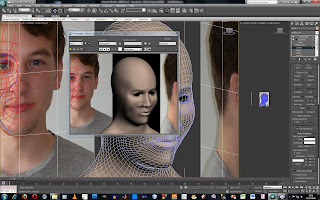
Here, I have added in the eyes and the base of my nose.
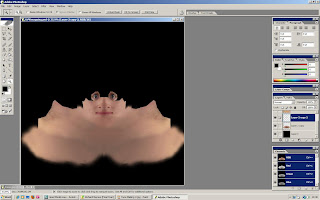
Now I have filled in the gaps between my mouth nose and eyes. I used the texture from the cheeks to fill in these parts, along with my upper lip under the nose.
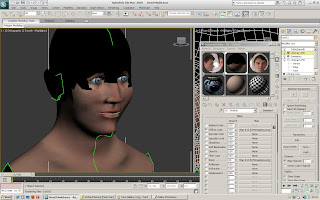
At this stage, I though it would be a good idea to add the material to my model, so that i could see if i was on the right track.
As you can see, so far so good!
For the ears, I didnt apply my ear texture, as I though it would be too hard to match up the highs and lows with the mesh. Instead, I used a part of the neck for the ears.
Here is an update on the model.
Here you can see I have started to fill in the rest of the head. Instead of adding my hair to the map, I instead just used skin, and carried the skin over where my hair should be. This would give me a better base for which to apply a Hair modifier later on.
Here is my material face complete.
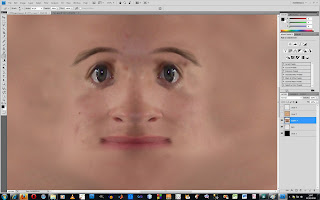
And here it is on the model.
I then opened this in Photoshop, so that I could start piecing together my face.
i applied a dark background layer so that i could see the mesh, and put the mesh as the top layer, so that I could work in between these 2 layers with all my different face parts.
Here is a screenshot of the first few steps.
As you can see, I have taken my neck texture from my original photos of my head, and started making the mouth.

Here, I have added in the eyes and the base of my nose.

Now I have filled in the gaps between my mouth nose and eyes. I used the texture from the cheeks to fill in these parts, along with my upper lip under the nose.

At this stage, I though it would be a good idea to add the material to my model, so that i could see if i was on the right track.
As you can see, so far so good!

For the ears, I didnt apply my ear texture, as I though it would be too hard to match up the highs and lows with the mesh. Instead, I used a part of the neck for the ears.

Here is an update on the model.

Here you can see I have started to fill in the rest of the head. Instead of adding my hair to the map, I instead just used skin, and carried the skin over where my hair should be. This would give me a better base for which to apply a Hair modifier later on.

Here is my material face complete.

And here it is on the model.

Monday, 18 October 2010
UVW Unwrapping.
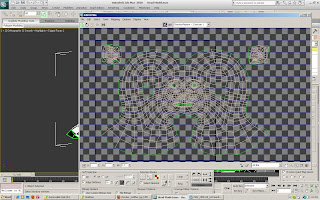
To be able to get a material to fit properly around the head, I had to apply a UVW Unwrap modifier. This would flattern out the mesh of my model, so that I could apply a material to it, and wrap the material around the model, following the mesh as a guide to where certain features are on my model.
I started by apply the UVW Unwrap to my model.
Once I had gone through a few basic steps, I went into the edit parameters tool, and came up with this.
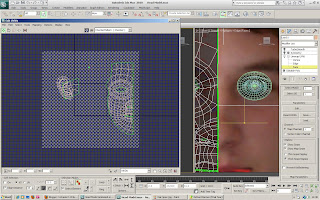
However this was wrong. It should be showing my whole head as a flat mesh, not my face and my ear seperately.
After some fiddling, I corrected this.
In order for the material to flow properly on the mesh, reducing the amount of vertices in one area is crucial. If you have too many clumps of vertices, the material will stretch.
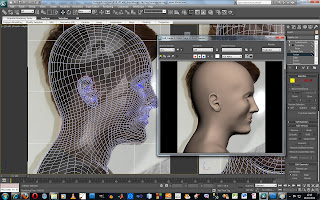
Here is an image of the finished UVW Unwrap applied to my model. It shows both sides of my head, along with the ears in the top cornes.
I welded the middle together, so that the material would be continuous along the front of the model.
I started by apply the UVW Unwrap to my model.
Once I had gone through a few basic steps, I went into the edit parameters tool, and came up with this.

However this was wrong. It should be showing my whole head as a flat mesh, not my face and my ear seperately.
After some fiddling, I corrected this.
In order for the material to flow properly on the mesh, reducing the amount of vertices in one area is crucial. If you have too many clumps of vertices, the material will stretch.
Here is an image of the finished UVW Unwrap applied to my model. It shows both sides of my head, along with the ears in the top cornes.
I welded the middle together, so that the material would be continuous along the front of the model.

Friday, 15 October 2010
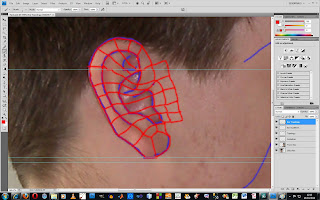
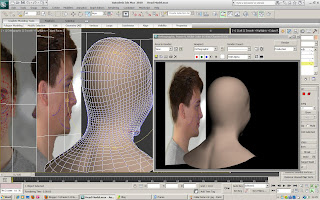
The Ear.
I found the ear to be quite a challenging part of the whole modelling process, as it is quite hard to work out, from your referance photos, where polygons should dip, be raised etc.
However, I followed the tuorial as closely as possible, and managed to come up with an ear that looks pretty similar to my own, and for that I'm happy.
I started with creating guidelines on my existing referance photos.
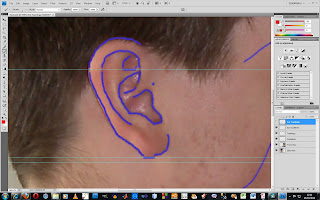
I then created Topology lines from my guidelines.
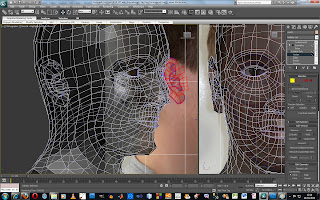
After this, I went back into 3DSMAX and started creating my ear, starting with drawing lines, and then moving onto creating polygons etc. I used the exact same method as I did for the face originally, so I already had some knowledge of what I was doing at this point. Also it would be pointless for me to explain how I did it, as I have already done that with the face.
Once i had pulled out all of the vertexs into place, I moved onto tweaking the ear into the right position, dipping parts in, to create the ridges in my ear.
After that, I created the black of the ear by extending the edges I already had.
Here you can see my ear complete, and sticthed onto my head. I attached the ear to the head in the same way that I connected the back of the head to the face, using the weld and attach features.
Here is a turbo smoothed version of my ear.
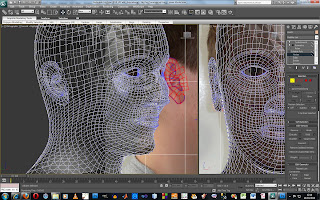
And here is a rendered side on view of my ear.
However, I followed the tuorial as closely as possible, and managed to come up with an ear that looks pretty similar to my own, and for that I'm happy.
I started with creating guidelines on my existing referance photos.

I then created Topology lines from my guidelines.

After this, I went back into 3DSMAX and started creating my ear, starting with drawing lines, and then moving onto creating polygons etc. I used the exact same method as I did for the face originally, so I already had some knowledge of what I was doing at this point. Also it would be pointless for me to explain how I did it, as I have already done that with the face.
Once i had pulled out all of the vertexs into place, I moved onto tweaking the ear into the right position, dipping parts in, to create the ridges in my ear.
After that, I created the black of the ear by extending the edges I already had.
Here you can see my ear complete, and sticthed onto my head. I attached the ear to the head in the same way that I connected the back of the head to the face, using the weld and attach features.

Here is a turbo smoothed version of my ear.

And here is a rendered side on view of my ear.

Thursday, 14 October 2010
Back of the Head and Neck Area.
Following the tutorials for the back of the head, I started with a sphere, to give me a rough cranium shape for my model. Once I had the sphere in place, I could manipulate its size and orientation to make it fit my referance planes. I then took away a number of polygons from the sphere, and started working my way down, creating polygons to slowly build up the shape of my head.
Ensuring that the polygons matched to the face was definately the tricky bit. I had to ensure that every polygon i created along the face touching side would tie in correctly with the back of the head. It was difficult, but eventually paid off. As my face contained quite a high number of polygons, i could use alot more creating the back of the head, which hopefully would help me later when it came to refining it.
Once the head shape was virtually there, I worked my way down onto the neck area, staring with the front chin area.
You can see from this image that creating the chin area was quite difficult, as I had to stretch a number of polygons. However, when I refined this later on, the stretching became less apparent.
I worked my way from the front to the back of the head during this stage.
With the neck essentially in place, I started work on the shoulders. For this I contiuned working my way down in the side view, creating the very top of the shoulders first, which I would then expand on front and back.
The following image shows part of the shoulder in place, along with the start of the chest area.
Once this stage was complete, I found it easier to weld the two parts to each other. I hated working with 2 seperate models as I couldn't see clearly through the objects when I made them semi transparent.
I could also now apply a skin tone colour to the model, which made the whole model look more uniform, and I could now see any imperfections from face to neck.
As you can see from the image image, there were some little ridges and blotches on the face, which I was not happy about. These would later be corrected.
I further extended the shoulders, back and chest until I had enough to my liking. I tried to follow my referance planes as good as possible to ensure that these areas came out looking realistic.
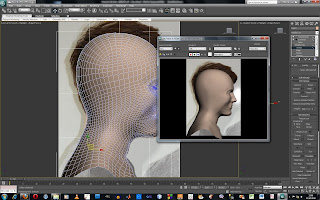
There were a couple of small touches I could put into the model to make it look alot more realistic. These were the collar bone area, the adams apple, and the ridge in the back where the spine sits.

To make these little effects, I simply raised some vertexs, and indented some others. Once turbosmoothed however, the effects became less apparent, so I had to go back and over exagerate the features on the model, so that they would show correctly on the model once turbosmoothed.
With these features finished, the face, head, neck and shoulders were complete. All that was left was some little refining here and these. Here is my model now that I have refined the ridges and bumps.
Here is the front view.
And here is a view from the side.
As you can see, the model flows really well and matches my referance planes almost perfectly. I am really happy with how the model is sitting now.

Ensuring that the polygons matched to the face was definately the tricky bit. I had to ensure that every polygon i created along the face touching side would tie in correctly with the back of the head. It was difficult, but eventually paid off. As my face contained quite a high number of polygons, i could use alot more creating the back of the head, which hopefully would help me later when it came to refining it.
Once the head shape was virtually there, I worked my way down onto the neck area, staring with the front chin area.

You can see from this image that creating the chin area was quite difficult, as I had to stretch a number of polygons. However, when I refined this later on, the stretching became less apparent.
I worked my way from the front to the back of the head during this stage.
With the neck essentially in place, I started work on the shoulders. For this I contiuned working my way down in the side view, creating the very top of the shoulders first, which I would then expand on front and back.
The following image shows part of the shoulder in place, along with the start of the chest area.

Once this stage was complete, I found it easier to weld the two parts to each other. I hated working with 2 seperate models as I couldn't see clearly through the objects when I made them semi transparent.

I could also now apply a skin tone colour to the model, which made the whole model look more uniform, and I could now see any imperfections from face to neck.
As you can see from the image image, there were some little ridges and blotches on the face, which I was not happy about. These would later be corrected.
I further extended the shoulders, back and chest until I had enough to my liking. I tried to follow my referance planes as good as possible to ensure that these areas came out looking realistic.

There were a couple of small touches I could put into the model to make it look alot more realistic. These were the collar bone area, the adams apple, and the ridge in the back where the spine sits.


To make these little effects, I simply raised some vertexs, and indented some others. Once turbosmoothed however, the effects became less apparent, so I had to go back and over exagerate the features on the model, so that they would show correctly on the model once turbosmoothed.
With these features finished, the face, head, neck and shoulders were complete. All that was left was some little refining here and these. Here is my model now that I have refined the ridges and bumps.
Here is the front view.

And here is a view from the side.

As you can see, the model flows really well and matches my referance planes almost perfectly. I am really happy with how the model is sitting now.
Wednesday, 13 October 2010
Progress!
Here I am updating my blog. I haven't been concentrating on the blog as much as the actual head model itself, but now I am rapidly approaching the finish line for the model, so I am going to update this blog with all of my progress so far. For the time being, I will be updating in non-chronological order, and will then sort through and organise it afterwards, so my apologies in advance for any confusion caused!
Saturday, 2 October 2010
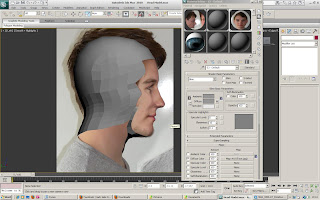
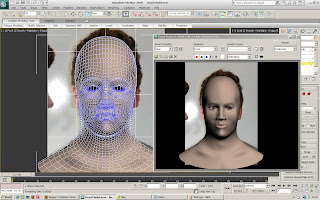
Face with a quick Render.
Here is a quick render with my face material applied to the face of my model. I used some knowledge from previous semesters to put the material on and match it up to the model.
However, now you can see the lines and ridges in my face, which are quite big imperfections. These will neeed to be sorted out.
But as you can see from the image, it does kinda look like me!

However, now you can see the lines and ridges in my face, which are quite big imperfections. These will neeed to be sorted out.
But as you can see from the image, it does kinda look like me!

Friday, 1 October 2010
Face (continued).
Now that I had all the features of my face pulled out, I could adjust each little bit to get it to sit right.

I could then apply a Symmetry modifier, so that both sides of the face were present.

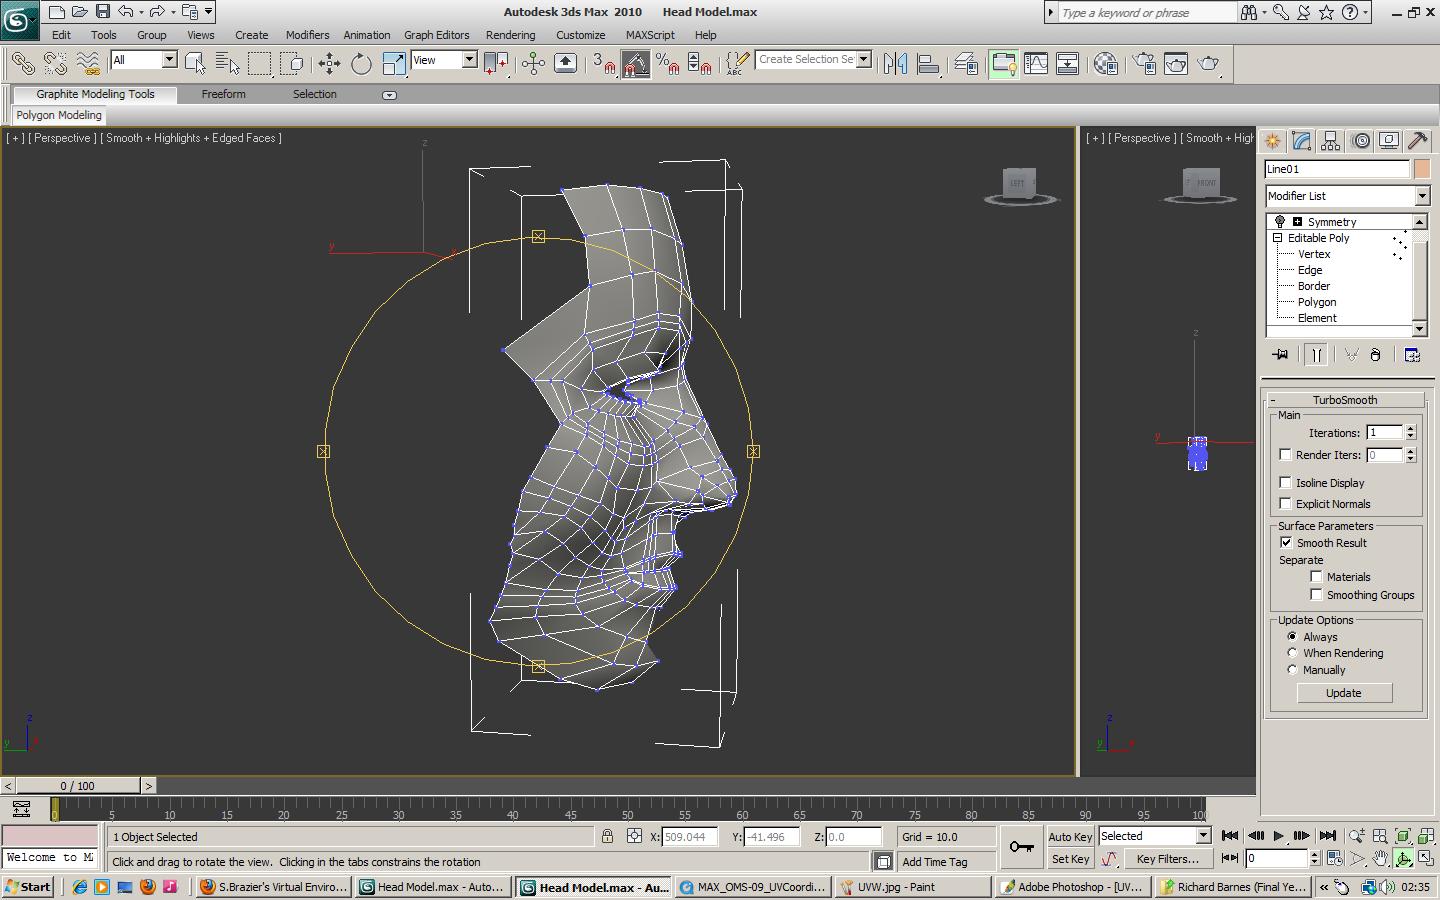
And now I could Turbo Smooth the model, so that it was a smooth skin surface.

I could then apply a Symmetry modifier, so that both sides of the face were present.

And now I could Turbo Smooth the model, so that it was a smooth skin surface.

Subscribe to:
Comments (Atom)